- Published on
Podman for Windows
- Authors
- Name
- Miththiran
Hello Folks!
If you have no idea how to install and use Podman on Windows, you’re in the right place. In this article, we are going to learn how to get and use Podman on Windows. Don’t panic—it’s not a deep, cranky article. By the end of this, you might just learn something today!
Let’s get started with a step-by-step guide to installing and using Podman on Windows. But before we jump into the process, I’ll first give you a quick introduction to Podman and why it’s such a game-changer in the container world.
Introduction of Podman
Alright, let's break it down in simple terms:
What Are Containers?
Imagine you have a favorite app, like a game or a photo editor. Normally, to run this app on a different computer, you'd need to make sure that computer has all the right settings and software. Containers solve this problem by packaging the app along with everything it needs to run—like its own mini-computer. This way, you can run the app anywhere without worrying about compatibility issues.
Famous Container Management Tools
When it comes to managing these containers, two big names stand out: Docker and Podman. Think of them as helpful assistants that create, run, and organize containers for you. Docker has been around longer and is widely used, while Podman is a newer tool that's gaining popularity.
Docker vs. Podman
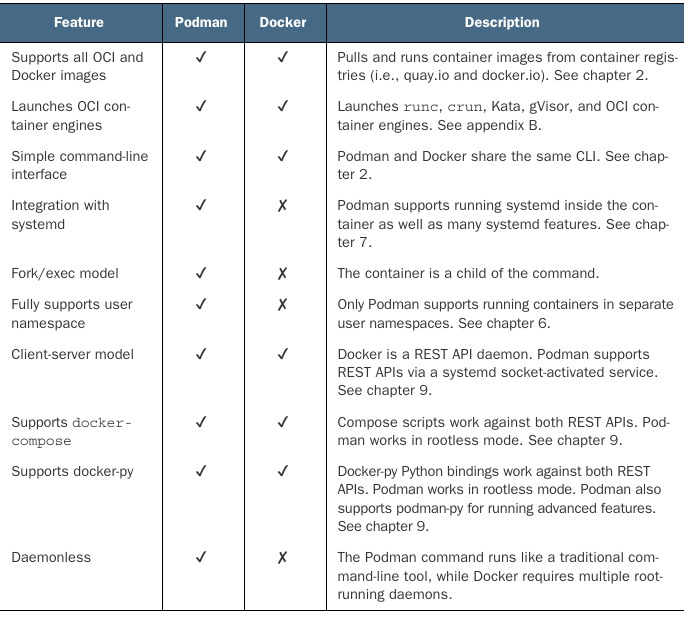
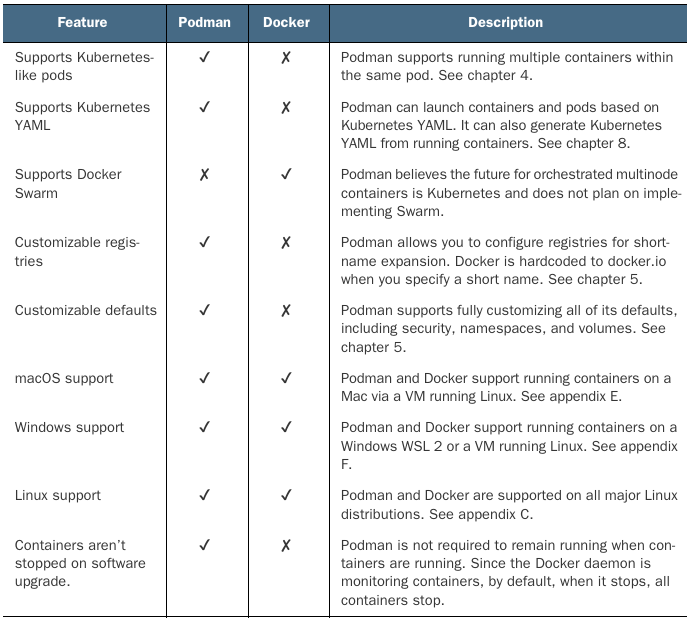
Both Docker and Podman help you work with containers, but they have some key differences. Docker uses a background service (called a daemon) to manage containers, which means it requires administrative privileges. Podman, on the other hand, doesn't rely on this background service and can run containers without needing special permissions, making it a bit more secure and lightweight.
Why Is Podman a Game Changer?
Podman is shaking things up because it offers a more secure and flexible way to manage containers. Its ability to run without special permissions reduces security risks, and its compatibility with existing Docker tools means you can switch to Podman without much hassle. Plus, Podman's design allows for faster container startups, making your workflow more efficient.
For a visual explanation of containers, you might find this video helpful: What is a Container?
Did you get it? now you know what is podman now we just worry abut how to use it on Windows
Podman for Windows
"Containers are Linux," but guess what? Podman works on Windows too! It runs through a virtual Linux system called a Podman machine, which you can manage using the podman machine command. On Windows, this machine is powered by WSLv2, and you can access Podman straight from PowerShell, CMD, or even hop into the Linux environment if that’s your vibe. Oh, and the best part? Podman plays nice with Docker tools, so you can keep using all your favorite stuff without a hitch!
Prerequisites
To use Podman on Windows, you’ll need Windows 10 (build 18362+) or Windows 11 (build 19041+ for arm64). Since WSL relies on virtualization, make sure hardware virtualization is enabled, and if you're running Windows in a VM, nested virtualization is a must.
Also, grab the modern "Windows Terminal" for a much better experience than the old PowerShell or CMD. You can find it in the Windows Store or just run this command:
winget install Microsoft.WindowsTerminal
It’s easy, and trust me, it’s worth it!
Installing Podman
To install Podman on Windows, start by downloading the Windows installer from the official GitHub release page. Make sure to grab version 4.1 or later for all the features in this guide.
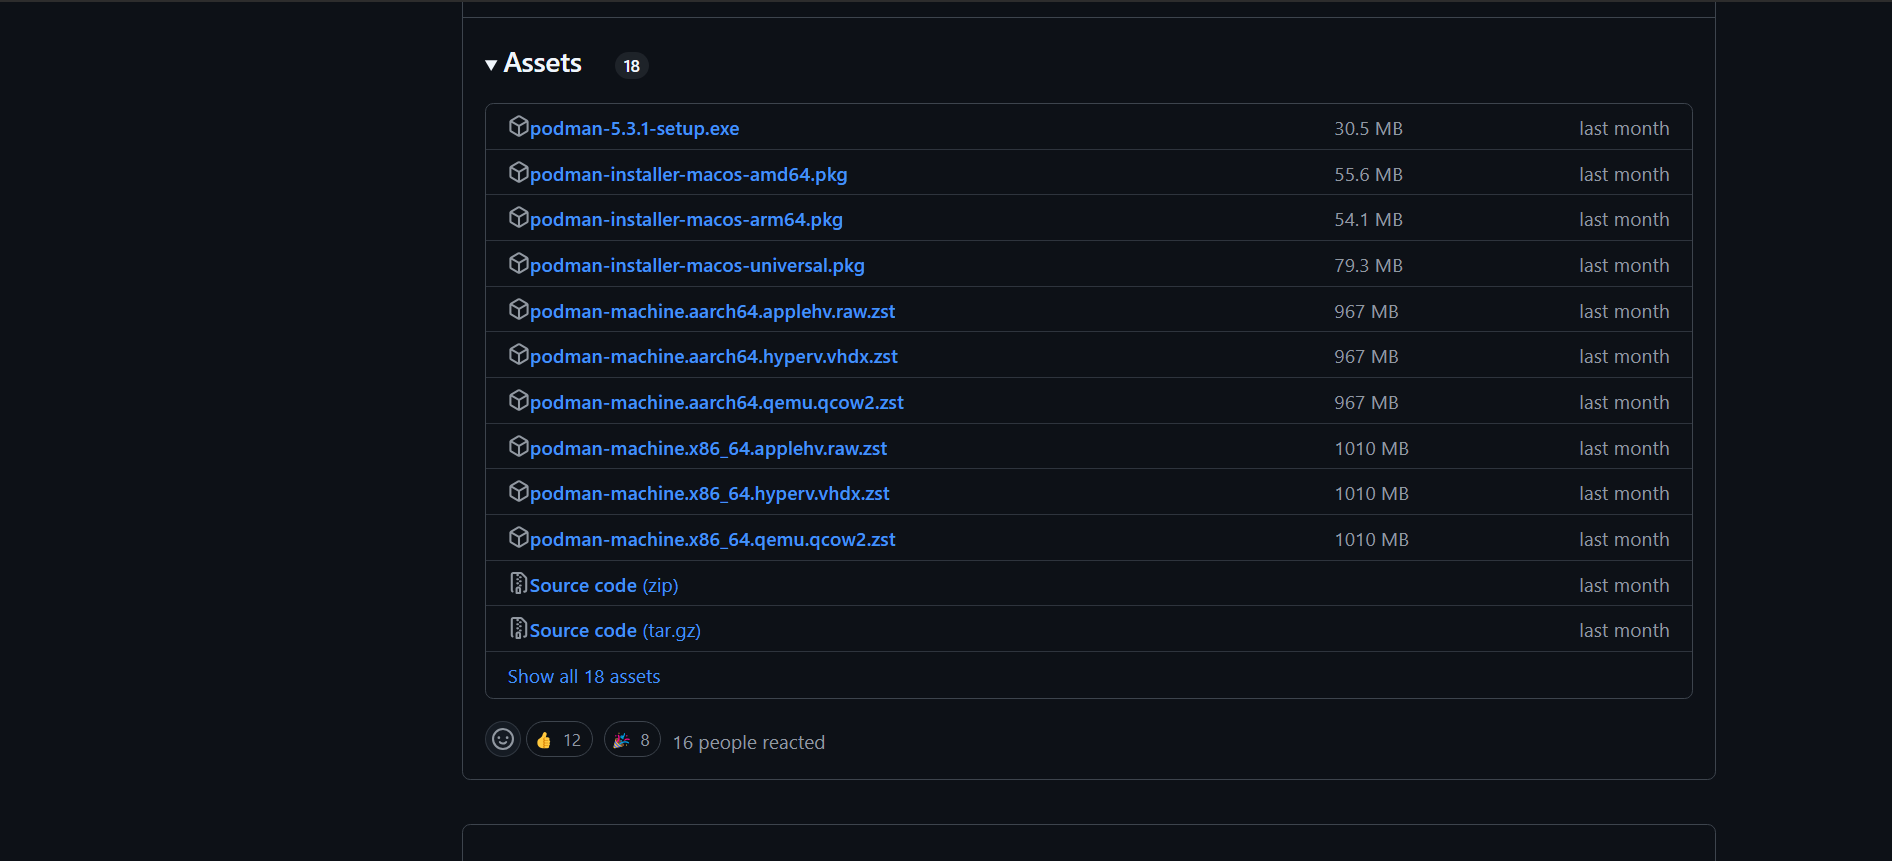
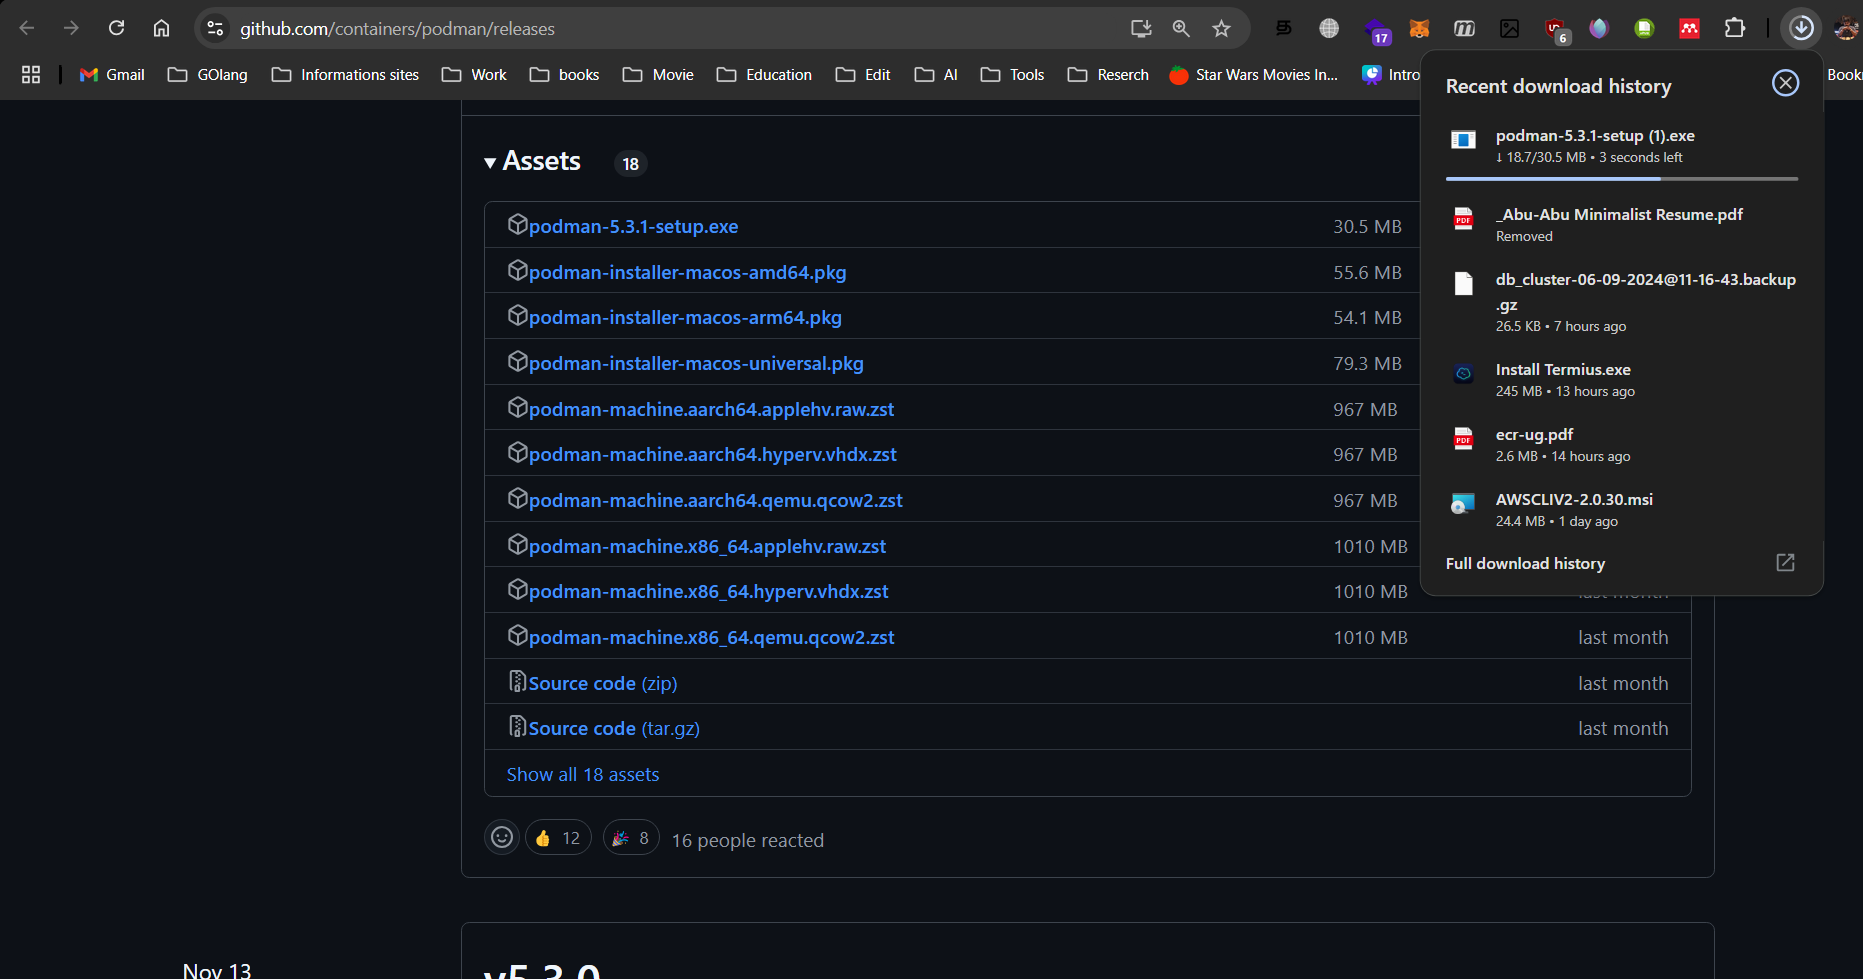
Once downloaded, run the EXE file and restart your terminal. After that, podman.exe will be ready to use, and you can set up your first Podman machine with this command:
podman machine init
Easy, right? You're all set to start using Podman!
Automatic WSL Installation
If you don’t have WSL installed, the podman machine init command will prompt an automatic installation. Just accept it, and Windows will handle the setup: installing required components, restarting your system, and relaunching the process in a terminal. Patience is key—Windows might take a minute or two to relaunch. If you prefer, you can skip the auto-install and set up WSL manually, but it’ll take extra time and effort.
Machine Init Process
Once WSL is ready, running podman machine init sets up a minimal Fedora environment tailored for Podman. The setup process might take a few minutes, especially if it’s a fresh WSL installation. Here’s what happens: files are extracted, Fedora is customized, and your machine is prepped with keys and configurations. When done, you’ll see a success message along with instructions to start your machine:
podman machine start
Starting the Machine
After initialization, you can start or stop the machine whenever you need. Just use:
podman machine start
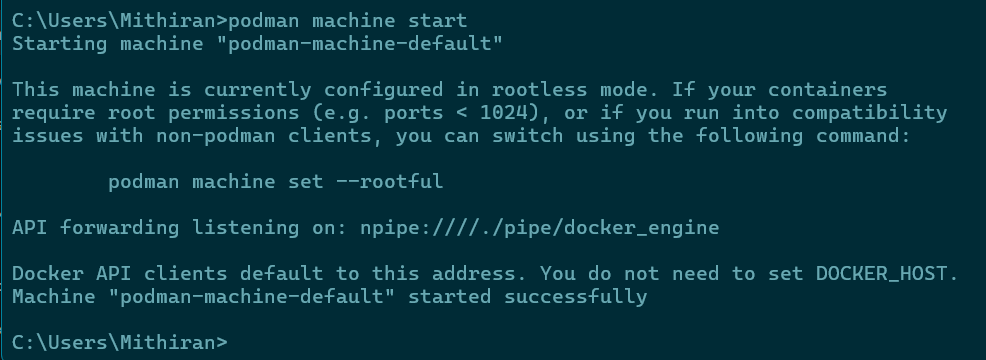
By default, the machine runs in rootless mode, which works great for most use cases. If you need root access (e.g., for ports below 1024) or better compatibility with Docker clients, you can switch to rootful mode with:
podman machine set --rootful
Once the machine is started, Podman will even listen on the Docker API, so Docker tools can connect without extra setup. Pretty smooth, right?
First Podman Command
Once everything’s set up, Podman commands work just like they do on Linux. Want a quick test? Try running a simple Linux date command right from PowerShell:
podman run ubi8-micro date
Boom! You’ll get the current date and time. Easy, right?
Rootful & Rootless
Podman on WSL runs in two modes: rootless (default) and rootful. Rootless mode uses a non-privileged user for added security and mirrors the default behavior of Podman on Linux. Rootful mode, on the other hand, runs as the root user and is needed for certain tasks. Here’s the catch: containers in rootful and rootless modes are isolated from each other. For example, running podman ps in one mode won’t show containers from the other.
If you need rootful mode (e.g., for a container that requires root or to bind a port below 1024), you can switch by stopping the machine and running:
podman machine stop
podman machine set --rootful
Want to go back to rootless? No problem—just do this:
podman machine stop
podman machine set --rootful=false
While rootless is fine for most scenarios, some containers or services (like MySQL) might need rootful for those low-numbered ports. But don’t worry—Podman is always improving, and future updates might make rootless even more flexible!
Listing Podman Machine(s)
To see all available Podman machines and their resource usage, just run:
podman machine ls
This shows details like the machine name, type, status, and resources (CPU, memory, disk size). For example:
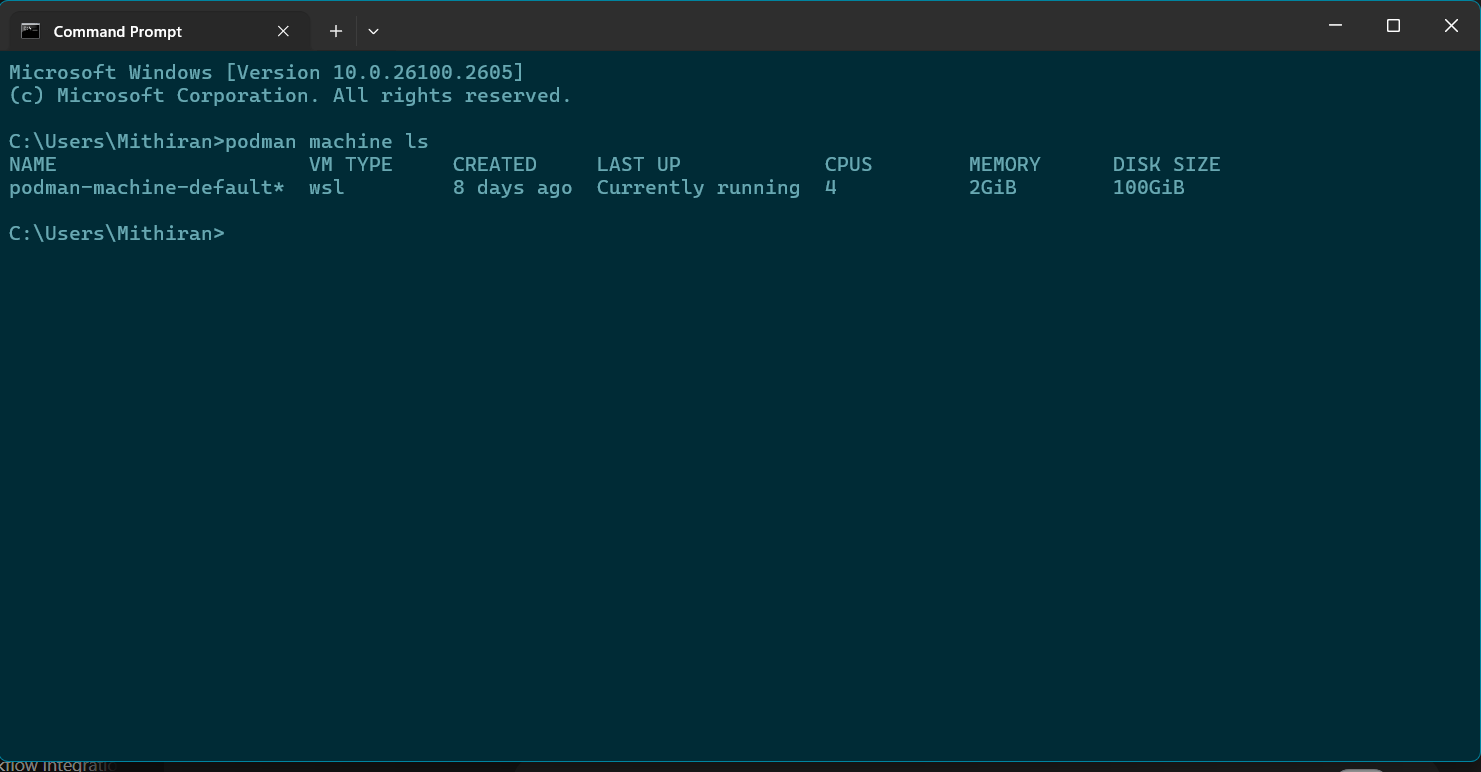
Remember, WSL shares the same virtual machine and Linux kernel for all distributions, so CPU and memory values are shared across systems. However, the disk size is unique to each distribution.
Using the WSL Command
You can access the Linux system directly using the wsl command. By default, this logs you in as root due to WSL's limitations with system services (systemd). To access your Podman machine, specify it with the -d flag:
wsl -d podman-machine-default
This drops you into the Podman machine’s shell, running systemd in a nested namespace. To exit back to the parent namespace, use ctrl-d or type exit—you might need to do this twice if you’re logged in as a user.
If you want to use Podman in rootless mode (non-privileged user), switch users with:
su user
Or, for a quicker way, use enterns with the wsl command:
wsl -d podman-machine-default enterns su user
You’ll now be operating as a non-root user. For root tasks or system services, prefix your command with enterns, like this:
wsl -d podman-machine-default enterns systemctl status
Avoid using the -u option or running commands without enterns, as it can cause issues by targeting the wrong namespace. Stick to these steps for smooth sailing!
Using Windows Terminal Integration
Accessing your Podman machine through Windows Terminal is super easy. Just click the drop-down menu and select podman-machine-default. This logs you in directly as root with just two clicks!
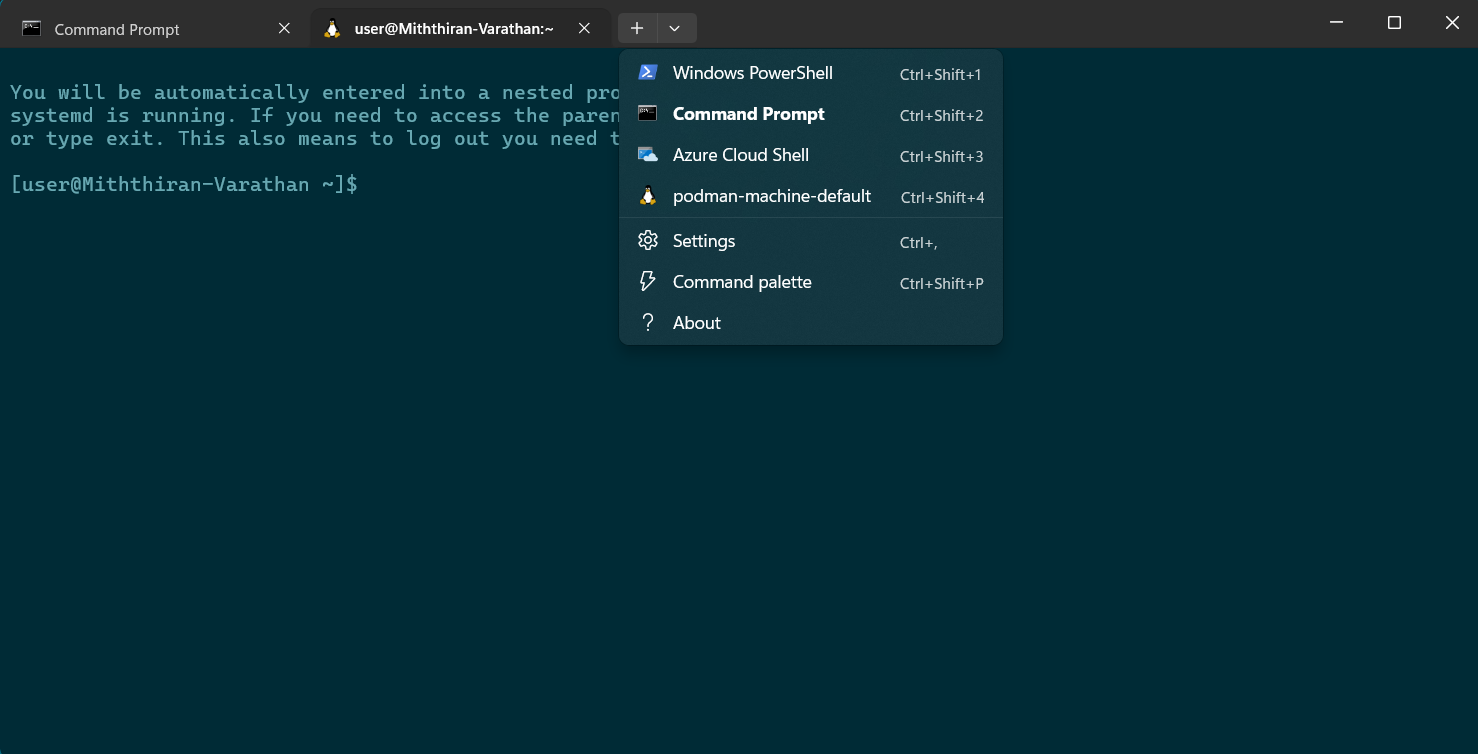
To switch to a non-privileged user for rootless Podman commands, simply type:
su user
For example, if you run the following command as a non-privileged user:
podman info --format '{{.Store.RunRoot}}'
You’ll get the container runtime directory for that user, such as:
/run/user/1000/containers
Simple, quick, and efficient—Windows Terminal makes managing Podman machines a breeze!
Stopping a Podman Machine
To stop a running Podman machine, use:
podman machine stop
For example:
PS C:\Users\User> podman machine stop
Machine "podman-machine-default" stopped successfully
Removing a Podman Machine
To completely remove a Podman machine, use:
podman machine rm
You’ll get a list of files to be deleted, like SSH keys and configuration files. Confirm by typing y when prompted:
Are you sure you want to continue? [y/N] y
Troubleshooting
Recovering from a Failed WSL Auto-Install
If the auto-install of WSL fails and retrying doesn’t work, you can manually reset and reinstall WSL with these steps:
Launch PowerShell as Administrator
Start-Process powershell -Verb RunAsDisable WSL Features
dism.exe /online /disable-feature /featurename:Microsoft-Windows-Subsystem-Linux /norestart
dism.exe /online /disable-feature /featurename:VirtualMachinePlatform /norestart
Reboot Your System
Manually Install WSL
wsl --installReinitiate Podman Setup
After WSL is reinstalled, continue with:podman machine init
With these steps, you can troubleshoot and get Podman up and running without a hitch!
Conclution
That’s all for now! We can learn something new in the next articles. Now for the main part—I’m going to jump to some conclusions: you really benefited from this, you learned something today, and, of course, that I’m a good writer. 😌😌😌✨